Web Chat Widget (Embed)
Create and customize a web chat widget, embed it on your site with the install snippet, and control it from JavaScript.
Objective
Add an AI chat widget to your website. From the Web Chat module you create one or more widgets, customize how each one looks and behaves, link it to an AI agent, and copy an install snippet to embed on your site. Visitor conversations are then supervised in the shared inbox.
Access
Sidebar -> Messaging -> Web Chat Routes:
- /app/{tenant}/webchat (create, customize, and manage widgets; get the embed code)
- /app/{tenant}/conversations?channel=web_chat (Web Chat conversations, reached from the View conversations button)
Widget management lives on this page. The conversations themselves live in the shared inbox, not here.
Roles
- owner, admin, agent
Prerequisites
- A verified email. An unverified workspace cannot create or edit a widget.
- At least one active agent with the Web Chat channel enabled (set in the Agents module). Without one, the create flow shows an Agent Required prompt with a Go to Agents link.
- Your plan's web chat widget allowance. New workspaces include one widget; more require a higher plan. Reaching the limit opens an upgrade dialog instead of the create form.
Overview chips
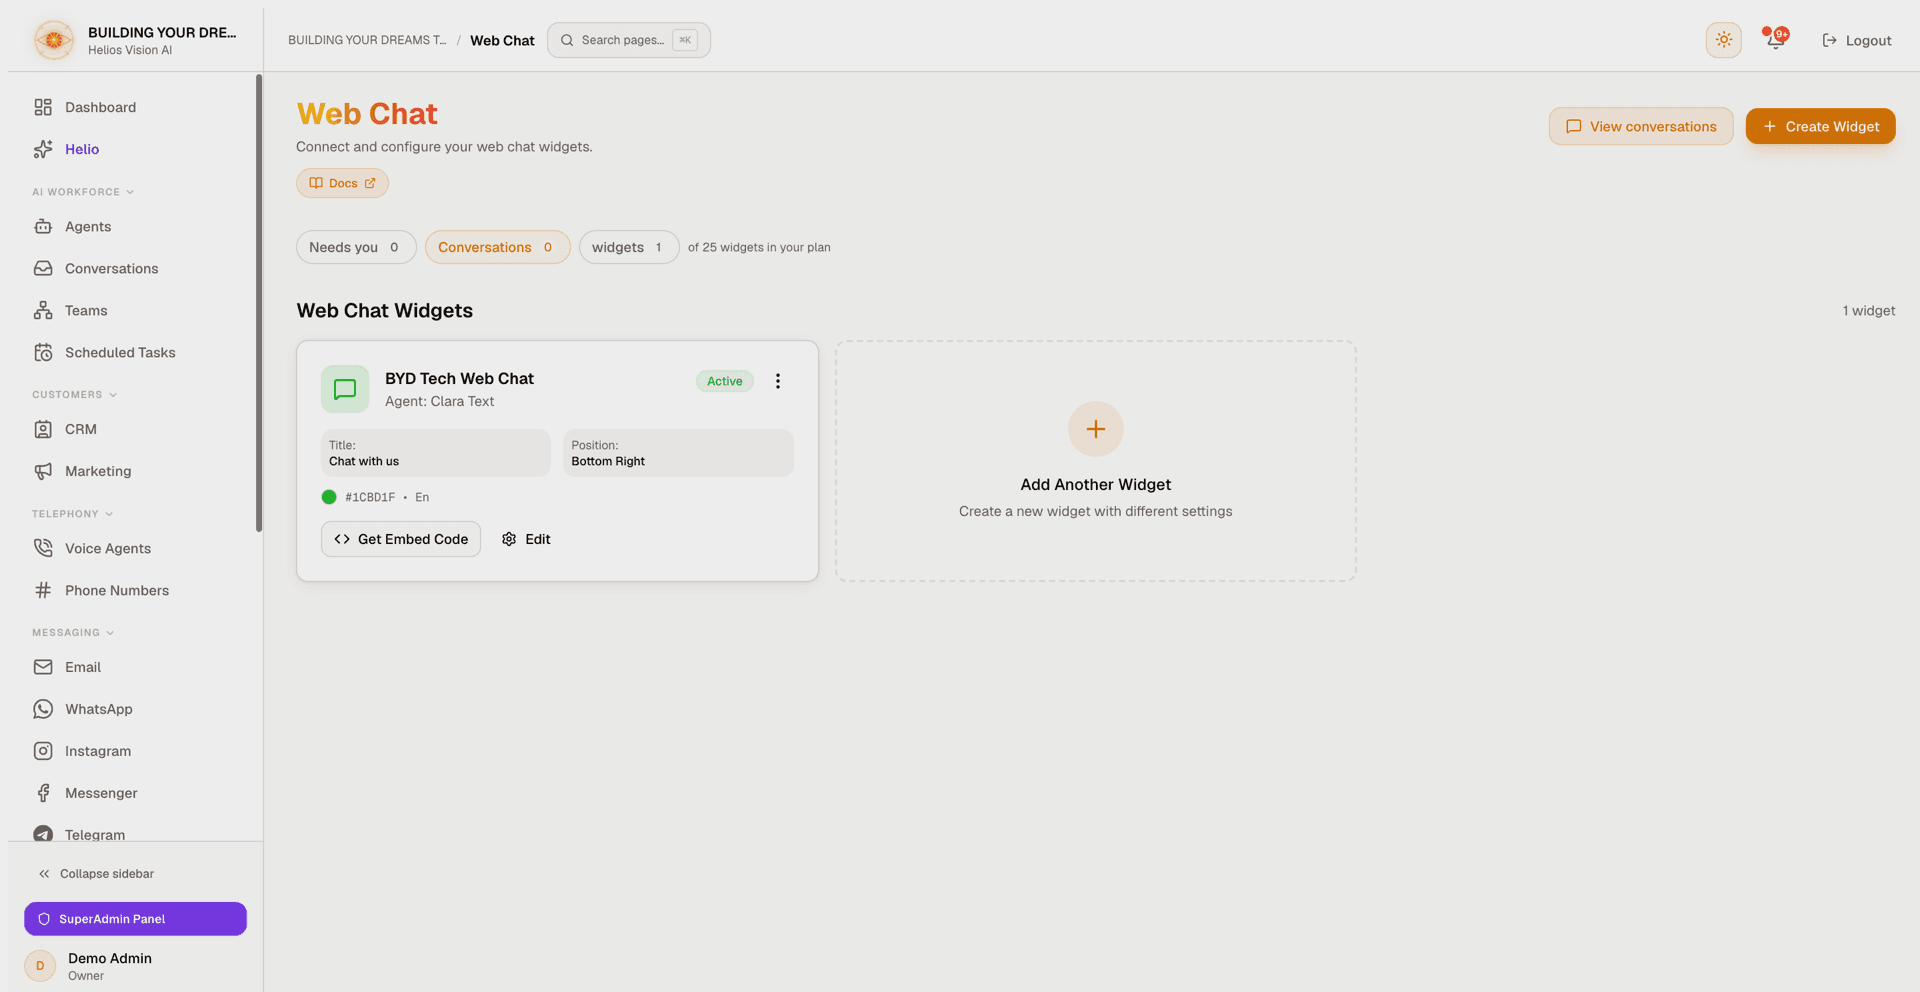
A row of stat chips sits at the top of the page (shown when your plan includes Web Chat):
| Chip | Shows | Action |
|---|---|---|
| Needs you | Web Chat conversations that require human attention | Opens Conversations filtered to Web Chat with the attention filter on |
| Conversations | Total Web Chat conversations | Opens Conversations filtered to Web Chat |
| widgets | Active widgets in use; turns amber when you reach your plan's ceiling | Static chip |
The strip ends with a plan line reading "of N widgets in your plan" (or "unlimited in your plan"). If the counts cannot be loaded, the chips are hidden rather than showing zeros.
Create and customize a widget
- On the Web Chat page, click Create Widget (for the first one, use the Create Your First Widget card).
- Fill in the modal titled Create Web Chat Widget. A Live Preview at the top reflects your changes as you type.
- Click Create Widget to save.
| Field | Notes |
|---|---|
| Widget Name | Required. Internal name to identify this widget; not shown to visitors. |
| AI Agent | Required. Must be an active agent with the Web Chat channel enabled. The picker offers solo agents (Agents (answer alone)) and, when eligible, teams (Teams (can ask a specialist for help)). |
| Language | Widget language shown to visitors: English, Spanish, Portuguese, French, or German. |
| Widget Title | Header text visitors see. Default "Chat with us". |
| Welcome Message | First message shown when the chat opens. Default "How can we help you today?". |
| Primary Color | Accent color, from eight presets or a custom hex value. Default #3b82f6. |
| Position | Bottom Right or Bottom Left. |
| Widget Theme | Light, Dark, or Auto. Auto follows the visitor's system preference. |
| Chat button icon | Floating button icon: Chat, Message, Support, Spark, Wave, or Helios. Each has its own subtle animation; Helios shows the Helios eye. |
| Animate chat button | Adds a gentle bounce to attract attention. Default ON. |
| Widget Avatar | Custom logo or avatar shown in the chat header (PNG, JPG, SVG, or WebP; max 2MB). |
| Allowed Domains | Restrict the widget to specific domains. Accepts example.com, *.example.com, and localhost:3000. Leave empty to allow any site. |
| Collect visitor name | Ask the visitor for a name before starting the chat. |
| Collect visitor email | Ask the visitor for an email before starting the chat. |
| Show branding | Display "Powered by HeliosVision". Turning it off requires the Growth, Business, or Enterprise plan; on other plans the toggle stays on. |
| Offline Message | Optional message shown when agents are unavailable. |
Notes:
- The Teams group only appears when your plan includes Teams and at least one eligible coordinator exists (an assignable agent with one or more approved specialists). Team entries read Team: {name} with the specialist count, using the custom team name when one is set; while a team is selected, a helper line under the picker links to Manage the team.
- A newly created widget always answers in solo mode, even if you pick a team in the create form. To hand a widget to a team, create it first, then reopen Edit and select the team there.
- Allowed Domains is enforced at runtime: when the list is set, the widget refuses to start chats from any other site. With no domains configured, the widget works on any website.
- If a widget's linked agent later becomes inactive or loses the Web Chat channel, the editor flags it and asks you to pick an active agent before saving.
Manage widgets
Each widget appears as a card showing its name, linked agent (Agent: {name}), an Active / Inactive badge, and a preview of its title, position, color, and language. Card actions:
- Get Embed Code — open the install snippets (see below).
- Edit — reopen the same modal, titled Edit Widget.
- The actions menu (⋮) adds Delete Widget.
When you have more than one widget, a Search box and a Sort control (Name A–Z, Name Z–A, Active first) appear above the grid.
Deleting a widget asks you to confirm. Existing conversations are preserved, but new visitors can no longer start chats with that widget.
Get the embed code
Open Get Embed Code on any widget to copy an install snippet. The modal (Embed Code for {name}) offers three paths:
| Option | Use it when |
|---|---|
| Install with your AI coding agent | You build with Cursor, Claude Code, v0, Lovable, or similar. Copy the prompt and paste it into your agent; it wires the widget into your framework for you. |
| Basic Installation | You paste the script into your site's HTML yourself, just before the closing </body> tag. |
| With Visitor Identification | Same as Basic, plus optional fields to pre-identify visitors (name, email, and custom metadata). |
Each snippet already contains your widget's ID and always points at the production URL, so it works from any site. The basic snippet looks like this:
<script>
  (function() {
    window.HeliosChat = {
      widgetId: 'YOUR_WIDGET_ID',
      apiUrl: 'https://heliosvisionai.com'
    };
    var script = document.createElement('script');
    script.src = 'https://heliosvisionai.com/widget/helios-chat.js';
    script.async = true;
    document.body.appendChild(script);
  })();
</script>
The With Visitor Identification variant adds optional keys inside window.HeliosChat:
window.HeliosChat = {
  widgetId: 'YOUR_WIDGET_ID',
  apiUrl: 'https://heliosvisionai.com',

  // Optional: pre-identify your visitors
  // visitorName: 'User Name',
  // visitorEmail: 'user@example.com',
  // metadata: { customerId: '123', plan: 'premium' }
};
Installation steps: copy the snippet, paste it just before the </body> tag in your HTML, save and deploy, and the floating chat button appears on your pages.
You can also drive the widget from JavaScript:
window.HeliosChat.api.open()opens the chat.window.HeliosChat.api.close()closes the chat.window.HeliosChat.api.sendMessage('Hi')sends a message.
Plan limits and branding
- The number of widgets you can keep active depends on your plan (some plans are unlimited). Reaching the limit opens an upgrade dialog instead of the create form.
- Removing "Powered by HeliosVision" branding requires the Growth, Business, or Enterprise plan. On other plans the Show branding toggle stays on.
Good practices
- Set up an agent with the Web Chat channel before creating a widget, so the widget has someone to answer.
- Use Allowed Domains to keep a widget from loading on sites you do not control.
- Turn on Collect visitor email when you want a way to follow up after the chat.
- Keep the snippet on every page of your site, loaded exactly once, so the button is available everywhere.
- Use the Needs you chip as your entry point: it lands on the conversations that are waiting for a human, not on everything.
Common notes
- If a widget shows the "previously linked agent is inactive" warning, activate the agent (or enable its Web Chat channel) in the Agents module, then reassign it.
- Deleting a widget does not delete past conversations; it only stops new chats.
- The embed snippet always targets the production URL, so it works even while you develop locally.
- If the overview chips are missing, the conversation counts could not be loaded at that moment; the widget list below still works. Reload the page to try again.
Related
Web Chat
Create and customize web chat widgets for your site, get the embed code, watch the channel indicators, and supervise the AI conversations.
Conversations
Supervise every conversation across every channel from one unified inbox: filter, reply, take over from the AI, and see CRM context in one place.