
Team
Invite teammates, assign admin, agent, or viewer roles, manage active seats against your plan, and track pending invitations.
Objective
Manage the people in your workspace: invite teammates, assign roles that control what each person can do, deactivate access when someone leaves, and see invitations that have not been accepted yet. This area is labeled Members in the app.
Do not confuse it with Teams, which groups your AI agents — Members is about the humans in your workspace.
Access
Sidebar -> Admin -> Members Path: /app/{tenant}/team
The Members entry appears in the sidebar only for the owner and admin roles, and only owners and admins see the management controls (the invite button and the actions column).
Roles
| Role | Access |
|---|---|
| owner | Full access. The founding account of the workspace. Fixed: it cannot be reassigned or deactivated. |
| admin | Full management: team, settings, reports, and all resources. |
| agent | Works with AI agents, conversations, channels, knowledge, and integrations. Does not see the Admin section (Reports, Members, Settings), Campaigns, or Phone Numbers. |
| viewer | Read-only access. The sidebar shows only the Dashboard. |
Only owner and admin can manage members (invite, change roles, activate/deactivate).
Prerequisites
- You are signed in as owner or admin.
- Your email is verified (unverified accounts are prompted to verify before inviting).
- Your subscription is active (a restricted or suspended subscription blocks inviting).
- Your plan has an available member seat. Active members and pending invitations both count toward the limit, so single-seat plans reach it with just the owner.
Members list
The main table lists every person in your workspace, active or inactive.
| Column | Description |
|---|---|
| Member | Name (or Unknown if not set) and email address. |
| Role | Owner, Admin, Agent, or Viewer. |
| Status | Active or Inactive. |
| Last Login | Date of the person's last sign-in, or Never. |
| Actions | Management menu. Owner/admin only. |
Two rows never show a menu: your own row shows You (cannot modify) — you cannot change your own account from this page — and the owner's row shows an Owner label, because the owner cannot be modified at all.
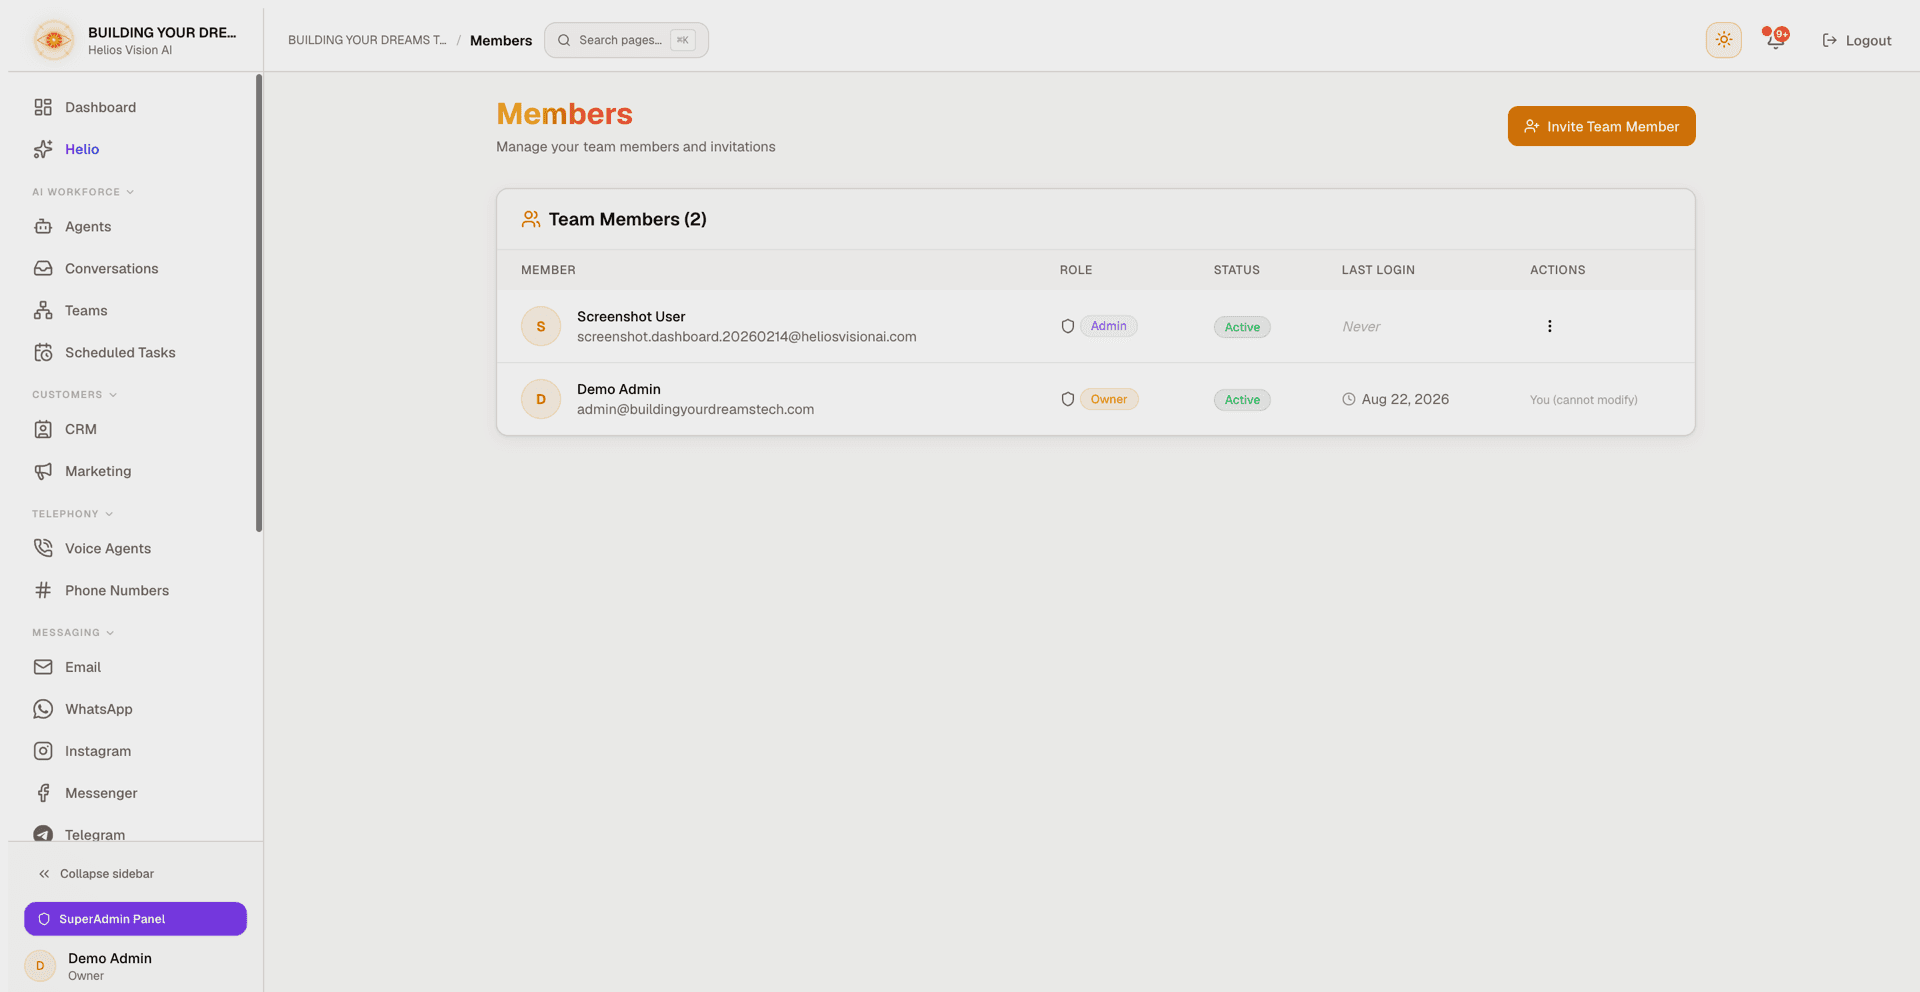
Invite a member
- Press Invite Team Member (top right).
- Fill in Email Address and select a Role.
- Press Send Invitation.
A confirmation shows the invited address, and a pending invitation is recorded under Pending Invitations. Invitations are valid for 7 days.
Fields:
| Field | Required | Format | Example | Notes |
|---|---|---|---|---|
| Email Address | Yes | Valid email | user@example.com | Must not already have an account in this workspace, and must not already have a pending invitation. |
| Role | Yes | Admin / Agent / Viewer | Agent | Sets the new member's permissions. Defaults to Agent. The owner role cannot be assigned here. |
The role selector shows a short description of what each option can do:
- Admin - Full access — Can manage team, settings, and all resources.
- Agent - Manage agents and conversations — Can create and manage AI agents and conversations.
- Viewer - Read-only access — Can view data but cannot make changes.
Accept an invitation
The invited person opens their invitation link, which shows the workspace name, the role they were assigned, and the invited email address. They fill in:
- Full Name (at least 2 characters).
- Password (at least 8 characters) and Confirm Password.
Pressing Accept Invitation and Create Account creates their account in your workspace with the role you assigned, active immediately. An invitation older than 7 days shows Invitation expired with the date it stopped being valid.
Change a member's role
- In the members table, open the Actions menu (three-dots icon).
- Under Change Role, select Admin, Agent, or Viewer.
- Confirm in the Change user role dialog by pressing Update role.
The member's current role is disabled in the menu. The new permissions apply immediately. The owner role cannot be assigned or changed from here.
Activate / deactivate a member
- In the members table, open the Actions menu.
- Press Deactivate User or Activate User.
- Confirm in the Deactivate user or Activate user dialog.
A deactivated member loses access immediately. Reactivating a member is blocked if it would exceed your plan's active-member limit.
There is no permanent delete on this page: deactivation is how you revoke someone's access. A deactivated member stays in the list as Inactive and can be reactivated later.
Pending invitations
Invitations that have not been accepted appear in the Pending Invitations table (owner/admin only, shown when at least one invitation is pending).
| Column | Description |
|---|---|
| Address the invitation was sent to. | |
| Role | Role the person will get when they accept. |
| Invited By | Name of the member who created the invitation. |
| Expires | Date the invitation stops being valid (7 days after it was created). |
An expired invitation can no longer be accepted, but it stays in this table and still blocks a new invitation to the same address. There is no cancel or resend control here — to invite that person again, use a different address or contact support to clear the old invitation.
Seats and your plan
- When inviting, active members plus pending invitations are counted against your plan's member limit. Deactivated members do not consume a seat for inviting.
- Reactivating a member checks only the count of currently active members.
- If a plan downgrade leaves you with more active members than the new plan allows, the extra members are deactivated automatically. Upgrading again reactivates only those automatically deactivated members (oldest first, up to the new limit) — members you deactivated manually stay deactivated.
Good practices
- Give each person the lowest role that lets them do their job. Use Viewer for read-only access.
- Keep only the people who need it as Admin; admins can manage the team and all settings.
- Deactivate members who no longer need access; deactivating is immediate and frees their seat for inviting.
- Track your member count — including pending invitations — against your plan so new invitations do not get blocked at the limit.
- Ask invitees to accept within 7 days; an expired invitation keeps its email address blocked until it is cleared.
Common errors
| What you see | Likely cause | What to do |
|---|---|---|
| Failed to send invitation | The email already has an account here, an invitation for that address is still listed under Pending Invitations (even an expired one), or your plan's member limit is reached by active members plus pending invitations. | Use a different email, free a seat or upgrade your plan, or contact support to clear a stuck expired invitation. |
| Verify-email prompt when pressing Invite Team Member | Your email address is not verified yet. | Open the verification link sent to your inbox, then invite again. |
| Subscription prompt when pressing Invite Team Member | Your subscription is restricted or suspended. | Resolve billing to restore access, then invite again. |
| Unable to update role | The role change could not be saved (for example, an attempt to change the owner). | Retry. The owner role cannot be changed. |
| Unable to update user status | Activate/deactivate failed, or activating would exceed your plan's active-member limit. | Deactivate another member or upgrade your plan, then try again. |
| Invitation expired (on the invitation page) | The link passed its 7-day validity before the person accepted. | The link can no longer be used. Arrange a new invitation for the person. |